Here are some of my tips for collaborative writing of academic papers in LaTeX. I will use ACM as an example (one of the largest association in computer science), but many tips should also apply to different fields and templates.
Inter-word and inter-sentence spaces
During the initial design of TeX, an English typesetting tradition from the 18th century was adopted: the spaces between sentences are longer than the spaces between words. Not only will TeX make sentence spaces longer, but when additional space is inserted due to text justification, the additional space is more likely to be added to the sentence spaces.
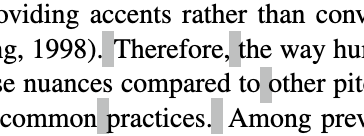
A screenshot of a sample LaTeX document. Both two sentence breaks are longer than word breaks, and the one before “A” is especially longer.
The compiler uses a very straightforward criterion to detect inter-sentence spaces: the space must follow a period (or other punctuations signalling the end of a sentence like exclamation marks and question marks), and the period follows a lowercase letter. If the space doesn’t follow such a period or when the letter before the period is capital, then it is a normal inter-word space. For example,
This work is done by A. Einstein.
A period following a capital letter often occurs when typing abbreviated names. Therefore, this rule normally applies.
However, there are some cases where this rule doesn’t apply:
In 1997, Apple Inc. purchased a company called NeXT.
In this example, the period after “Inc” initiates a word break rather than a sentence break. The period after “NeXT” initiates a sentence break rather than a word break.
To mitigate this issue,
LaTeX has a command \@,
which is an invisible (zero-width) lowercase letter.
Since it is invisible,
it only helps rectify tysetting logic relevant to cases.
For example, the above sentence can be rewritten as follows:
In 1997, Apple Inc.\@ purchased a company called NeXT\@.
The first \@ appears after the period,
so the next whitespace thinks it follows a lowercase letter (hence following a word, not a period).
So it simply reders a word break.
The second \@ appears before the period,
so the whitespace after this sentence correctly assumes
a “lowercase letter → period → space” pattern,
i.e., a sentence break.
The first \@ in this example can be also replaced by a \ command
(a backslash and a whitespace).
This command is a force word break.
No more if-else is considered. No more confusion between \@. and .\@.
But the downside is the legibiltiy:
it is quite easy to miss the backslash and mistake it for a plain whitespace.
(And a syntax highlighter won’t highlight spaces!)
Imagine your colleague or yourself making changes later,
and imagine they deleted the space but kept the backslash.
It may eat the next non-letter symbol or the entire next word,
resulting in compilation errors or accidental use of some (un-)lucky commands.
On the contrary,
insisting on using \@ can “scare away” collaborators that know less LaTeX secrets or haven’t read this article yet.
You entire sentences plus the additional \@’s are sure to stay intact after
any sane collaborators’ editing.
More Whitespaces… “Non-Breaking”?
There is another type of whitespaces in LaTeX:
the non-breaking whitespaces.
A non-breaking space is written as ~ (as oppose to ).
As its name indicates,
it prevent the engine to insert a line break there.
In academic writing,
the most common use case is before \ref and \cite.
For example,
Results in Section~\ref{section-label} are similar to previous findings~\cite{citation-key}.
Dashes, Daashes, and Daaashes
There are actually three different “horizontal line” symbols in English:
hyphen (-, the “minus” sign on many common keyboards), en dash (–, option + - on macOS), and em dash (—, shift + option + - on macOS).
In LaTeX,
they are represented by -, --, and ---, respectively,
as LaTeX doesn’t support Unicode symbols by default.
In English — meaning that not in math mode — hyphen is used in eye-catching, long-spanning, and self-made-to-show-off-thine-English-proficiency compound words. En dash is often used in writing ranges, just like the only 10–15% percent of people as smart as me to know these LaTeX tricks by today. Em dash function like a comma, a colon, or parenthesis or insertions — as you can see at the beginning and the end of this paragraph.
Just want to make sure that knowing this won’t confuse you
about what to use in the math mode.
Of course you use a single hyphen (-) as the minus sign!
(But you may have noticed that hyphens/minus signs are larger in the math mode to please the eyes of the chaotic formula-drawers.)
Captions and Labels
\label{...} declares a custom and internal key that you can use to create in-document hyperlinks in other parts of the document using \ref{...}.
To ensure that the \ref{} hyperlink jumps to the right position, one should always put \label right after the object being referred to.
For example,
\section{Introduction}\label{sec:intro}

As mentioned in Section~\ref{sec:intro}
% This renders "Section 1",
% where 1 is the actual section number of Introduction,
% and 1 is clickable.
For table and figure captions,
\label{} should appear right after \caption{}.
\begin{table}
  \caption{...}\label{tab:awesome-table}
  \begin{tabular}{...}
  ...
  \end{tabular}
\end{table}
\begin{figure}
  \centering
  \includegraphics[]{}
  \caption{...}\label{fig:cool-figure}
\end{figure}
You may notice that I always start a label with a type (tab:, fig:, sec:).
This it just to help me recall these labels later.
You can also see similar tricks in many LaTeX examples.
According to ACM style guide, a figure’s caption (and of course, label) should be placed after the content, and those of a table should appear before the content. This writing style guide may vary in other communities, but make sure to check the guide.
Horizontal Lines in Tables
Traditionally, \hline is for drawing horizontal lines in table.
They may appear above and below the entire table,
between the header and the main body,
and between a group of rows.
There is also \cline{i-j} to draw a horizontal line with specified beginning and ending position.
But nowadays, a strongly recommended replacement for \hline
is \toprule, \midrule, \bottomrule, and \cmidrule{} in the booktabs package.
So now you should write tables like
\usepackage{booktabs}
\begin{tabular}{...}
\toprule
... \\
\cmidrule{1-3}
... \\
\midrule
... \\
\bottomrule
\end{tabular}
The main difference are that \toprule and \bottomrule are thicker than regular \hline and \midrule,
and all the \...rule commands add extra vertical paddings.
Optionally, you can also use the thickness presets \heavyrulewidth and \lightrulewidth,
and customize the rule thickness like \midrule[0.6em].
I haven’t found an official suggestion of replacing every \hline commands,
but whenever I encounter a post or blog article talking about tables and using booktabs,
it is very likely that they suggest make the change.
It makes me feel like a similar suggestion to “Avoid using goto in C/C++.”
The booktabs package is already imported by the ACM template, for other communities, you may check their LaTeX writing guides.
Add Parameters to the Implicitly Imported Packages
Taking xcolor package as an example,
when we want to use more named color present shipped with the package,
we need to pass optional parameters when we import the package:
something like \usepackage[svgnames]{xcolor}.
However, the ACM template has already imported xcolor internally,
and it imports without passing any optional parameters.
Doing \usepackage[svgnames]{xcolor} below declaring \documentclass{acmart}
is useless because the package is already imported.
Therefore, the only correct way to append optional arguments is to add
statements like
\PassOptionsToPackage{svgnames}{xcolor}
before the documentclass declaration.
Useful Packages: Tables
The built-in LaTeX tables look like this
\begin{table}
  \caption{}\label{}
  \begin{tabular}{cllcp{2cm}...}
  ...
  \end{tabular}
\end{table}
However, it has limited functionality.
If we need long paragraphs in one (or many) columns,
we need to specify a p{length} column of fixed length,
otherwise the column will strech with the text and never wrap.
To avoid tedious tuning of column lengths,
another approach is to use tabularx,
which specifies the entire table width and
allow certain columns (with X spec) to strech till fit.
tabularx replaces tabular,
and it requires another parameter of the table width.
\begin{table}
  \caption{}\label{}
  \begin{tabularx}{\textwidth}{cXlcX...}
  ...
  \end{tabularx}
\end{table}
There are also cases where we need super long tables
that may require a line break midway.
Instead of manually creating several tables,
we can use the longtable package and its environment with the same name.
We will only need to write a single table, and it will handle the wrapping for us.
You can check out the official documentation for its usage.
Also checkout the package longtablex if you want both longtable and tabularx. But this package is not officially supported by ACM.
Sometimes we also want to put a footnote for some content inside the table.
Normal \footnote{} will never work in table-like environments.
The correct way is to use threeparttable,
which can appends a dedicated note area right below the table.
Also checkout the package threeparttablex if you want both threeparttable and longtable functionalities. (Note it is not threeparttable plus tabularx!) This package is not officially supported by ACM either.
Finally, there is a more modernized table package called tabularray that puts all the thing above together, plus simplified syntax for formatting and cell-combining.
I have already wrote an article about it.
But do pay attention to its capability with your publisher’s restrictions.
Throw Your Collaborators This Blog, Don’t Create LaTeX Commands for Them
Throughout my various collaborative LaTeX writing experiences,
I realized that it is hard to let my collaborators know all the LaTeX tips I know, plus those project-specific writing guidelines and terms.
So I used to create many shorthand commands,
some combine several commands together (like a shorthand figure+includegraphics),
some are combinations of words and punctuations (possibly also non-breaking spaces and stuff) to make sure that they are used correctly.
But later,
I found it more troublesome to ask them to use these commands than plain text and codes.
I used to have a \newcommand{\eg}{e.g.,} just to ensure
that there was a comma after “e.g.” (to follow Chicago style,
which is adopted by ACM),
it was not “eg”,
it was not italic,
and so on.
Then I found a lot of eaten spaces in our article because we used
\eg something instead of \eg{} something.
(No matter if we declare “no parameter” while defining the command,
LaTeX will eat the content inside the next braces or the next single character if no braces are presented as the command’s parameter.
An exception is when the next character is not a letter nor a space,
then the command eats no parameter and put the character on screen.)
Then I realized typing lots of empty braces is even more distracting,
so I changed to \newcommand{\eg}{e.g.} and told collaborators
to write \eg, something.
This way we didn’t need to type braces anymore;
plus, collaborators now remember a genuine Chicago style rule,
instead of some random custom rule I create.
As a result,
I found more e.g., than \eg, in my document,
because my collaborators didn’t have that command in others’ documents,
and even I constantly hesitated whether that command include the comma or not.
If eventually I had to debug their punctuation usage,
I could have used plain text at the very beginning!
In LaTeX, command definitions are far away from the cursor, and there is no “jumping to definition” feature in LaTeX. Simple wrapper commands — especially those grouping words instead of logics — cannot earn enough attention, and they may even backfire in a hard-to-notice way (like eaten characters). Therefore, it is better to deliver all the writing guidelines to all the collaborators in a briefing session, and use simple old global search to debug the misconduct in the LaTeX document.